APEX Sink
· Rigging · Houdini · Houdini MOC ·
TOC
Guidelines
from Electra example
Character Setup
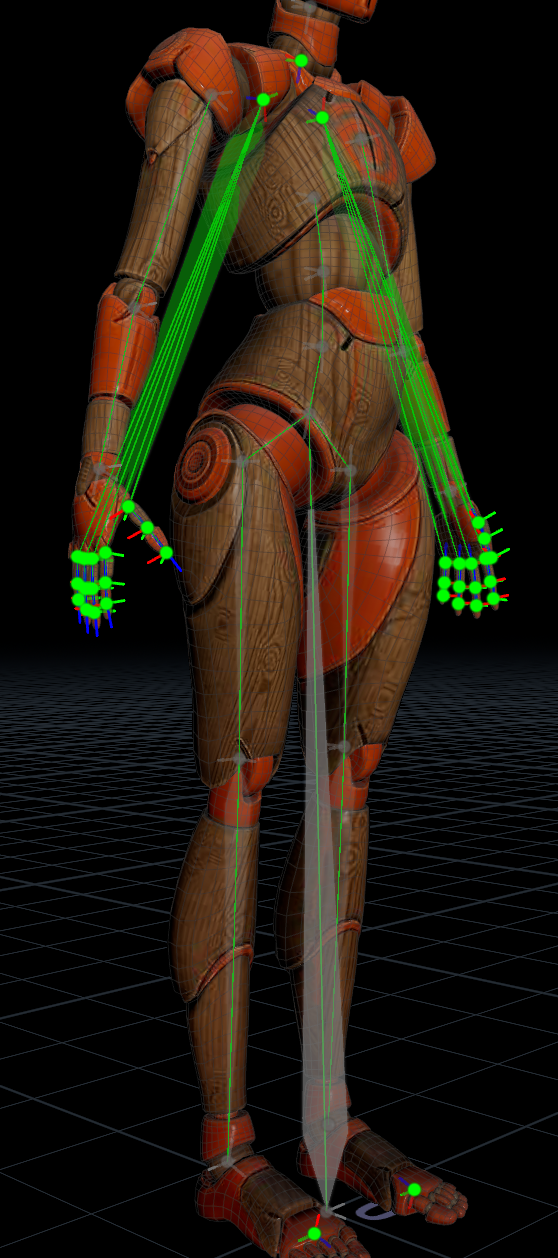
Guides skeleton
Guides skeleton is from Animated pose output, not from the rest skeleton.
SideFX note on the Guides properties:
The guide properties are being used when we create transformobjects like controls from them. this is very helpful do define in advance which guides will for example be promoted to controls and how they are supposed to look
{
"scaleinheritance":2,
"rord":3,
"xord":0,
"promote":"t r s",
"shape":"box",
"shapetranslate":[0,0,0],
"shaperotate":[45,10,0],
"shapescale":[1,1,1],
"shapecolor":[1,0.2,0.3]
}
Promoted properties
Adjust Dictionary "promote_rotation" on Points
Point group: all fingers, clavicles start (shoulders), neck start, foot balls (toes start)
Attribute name: properties
Set values:
Shapes
Adjust Dictionary "set_shape" on Points
Point group: all
Attribute name: properties
Set Values:
then additional scalers and shapes for particular controls
Orientations
Set control orientations to ident
Rig Attribute Wrangle on Points.
Code: 3@transform = ident();
Mirror attributes
The reverse foot setup needs a mirror attribute on the points in order to know on which controls to apply the offsets for the toe controls
Rig Attribute Wrangle on Points.
Group: @P.x<=-0.01
Code: i@mirror = 1;
Colorize
The Cd attribute will be used for the control color if it is found
First Color node for all (mid section)
Then Color nodes for @name=*_l @name=*_r and fingers
Tags
Keep applying to animated skeleton
Attribute Adjust Array on Points, String datatype
Values set:
mirror for @name=foot_r @name=ball_r @name=toe_r @name=R_Foot_Tilt_b @name=R_Foot_Tilt_a @name=R_Foot_Heel @name=R_Foot_toe_r
Head_parent for @name=neck_01
R_Limb for @name=thigh_r @name=calf_r @name=foot_r @name=ball_r @name=toe_r
L_Limb for @name=thigh_l @name=calf_l @name=foot_l @name=ball_l @name=toe_l
ToeTip for @name=toe_r @name=toe_l
tip for @name=spine_03
L_Leg_parent R_Leg_parent root for @name=pelvis
ToeBall for @name=ball_l @name=ball_r
Ankle for @name=foot_l @name=foot_r
L_Arm for @name=upperarm_l @name=lowerarm_l @name=hand_l
and R_Arm
L_Leg for @name=thigh_l @name=calf_l @name=foot_l
and R_Leg
Head for @name=head
L_Fingers and R_Fingers for fingers without hand joint
Pelvis for @name=pelvis
Spine for @name=pelvis @name=spine_01 @name=spine_02 @name=spine_03
Chest for @name=spine_03
L_Foot for @name=foot_l @name=ball_l @name=toe_l
and R_Foot
Pack
Here we pack all the elements we are going to use in the rig graph, using a packed folder node.
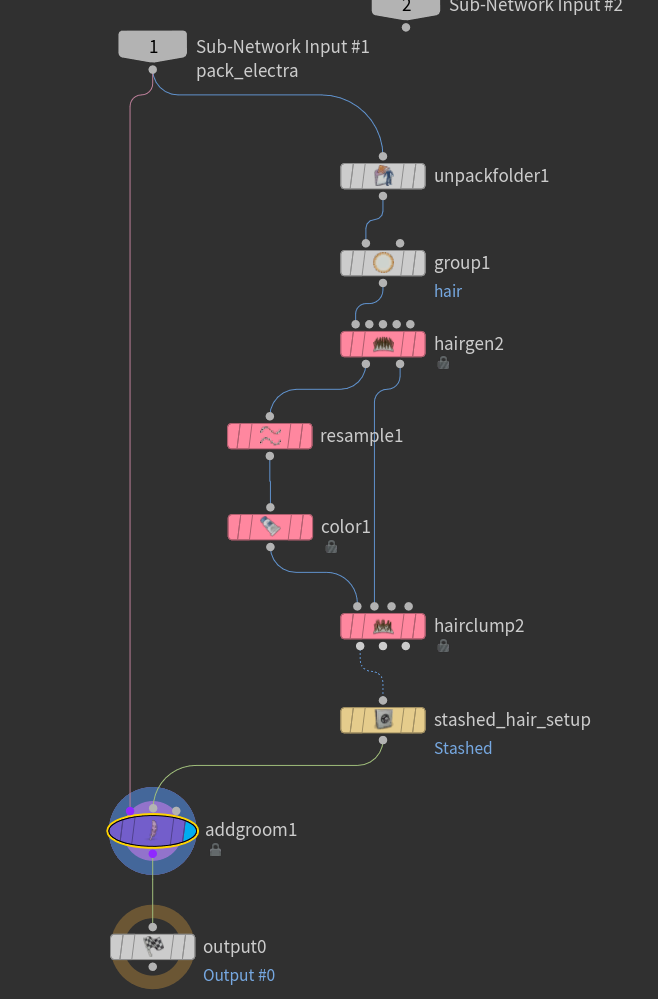
Groom
Here we add the groom shape and skeleton to the character. The rig will be set up at a later stage in the graph
Rig Setup
fktransform
We first start off by creating the controls for the rig. This will set up the hierarchy based on the skeleton that you are using. Note, if the tags are applied on the guides skeleton, you have to use the guides skel as the source in order for those tags to show up on the transform objects in the rig.
All default with rpromotegroup set to root
bonedeform
Here we add the bonedeform to the rig.
All default
transformdriver
Add controls that can be used in the rig. The transform driver will also update the guides skeleton, adding new joints and updating the hierarchy
The segments on the component are the wildcard pattern to tag that we can loop over to apply the setup
e.g *Leg will add an ik to joints with the tags L_Leg and R_Leg. If w character doesnt have a tag then the setup will simply not be applied
setups: 4
1.
Driven: root
Control:
driver: Main
Driven: %tag(Pelvis)
Control:
driver: Pelvis
driveguide: %tag(Pelvis)
friveparent: Main
Driven: %tag(Chest)
Control:
driver: Chest
driverguide: %tag(Chest)
driveparent: Pelvis
Driven: %tag(Head)
Control:
driver: Head_main
driverguide: %tag(Head)
driveparent: %tag(Head_parent)
spline
Spline setup, this uses segments in order to set up multiple splines in one component
Settings:
curveorder: 2
tangent: 0,0,-1
pinroot ON, pintip ON
Driven:
segments: Spine
root: %tag(root)
tip: %tag(tip)
Driver:
rootname: root
rootcvname: rootcv
tipname: tip
Parents:
rootparent: %tag({segment}_parent)
tipparent: %tag({segment}_tipparent)
cvparent: root_ctrl
Tags:
tags: spline
multiik
Multik setup, will create multiik chains. This uses segments in order to set up multiple ik chains in one component
Driven:
segments: *Leg *Arm
driven: %tag(bind)
Parents:
tipparent: Main
Tags:
ik_root, ik_polevec, ik_tip
ikfkblend
Driven:
segments: *Limb *Arm
iknodes: %tag(bind)
fknodes: *
Tags:
tags: ikfk_setup
reversefoot
Something to note about the reverse foot is that you need to have a mirror point attribute that on the guide skeleton in order for the mirroring to work. There is an example of this in the electra network. This is however only necessary if you want to set up both feet using one component
Settings:
Many numbers, not sure if default
Driver: Main
Driven:
segments: \8Foot
ankle: %tag(Ankle)
ball: %tag(ToeBall) & %tag(bind)
toe: -
ikdriven: %tag(ik_tip)
Tags:
tags: reverse
lookat
aim_head
Lookat setup, here you can set up multiple lookat constraints. they can be daisy chained for more complex rigs
name: lookat
Settings:
updir: 0,1,0
targetpos: 0,0,0.6
worldspace ON
Driven:
setups: 1
parent: %tag(Headmain)
driven: %tag(Head)
driver: Head_driver
target: Head_aim
up: head_up
keepoffset ON
Tags:
tags: -
transformdriver (again)
reparent_aims_to_head
Here we are parening the newly created Head aim control to the head main control. This is useful when new controls are added and we need to adjust the hierarchy.
setups: 1
Settings:
all OFF! no trs
Driven:
driventransforms: -
Control:
driver: Head_aim
driverguide: -
driveparent: Head_main
makecontrol OFF
rord, xord: 0
Tags:
tags: -